

How To Repair Leather Hole
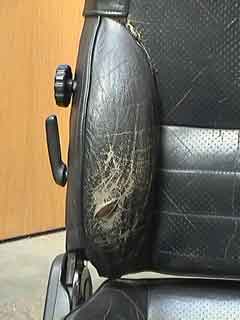
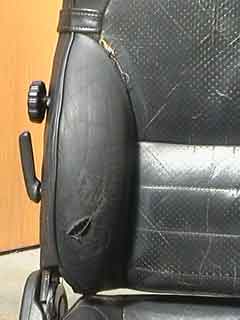
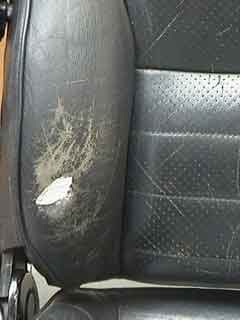
To the left is a leather seat from an MR2, as tin can be seen, with years of employ it has suffered significant damage to the left mitt side The friction acquired by rubbing against the leather has, over the years, resulted in a pigsty beingness made and a lot of abrasion to the surface. The below guide is intended to teach you about leather car seat repair, specifically showing you how to repair a hole in a leather car seat.
PRODUCTS REQUIRED
- Leather Repair Kit - To Repair the hole. This kit also contains a pocket-sized amount of color, so can exist used on its ain to repair small areas of damage on a leather auto seat.
- Small Leather Colourant Kit - Used to restore the leather colour to the whole bolster.
We besides have a total selection of Leather Car Seat Repair products on our website.
Leather Car Seat Repair Method
Footstep one. Gear up the leather machine seat
The first pace it to prepare the leather for repair. Using the Leather Prep & abrasive pad, included in the Colourant Kit, gently rub the surface of the leather to remove whatsoever grease and oils that accept accumulated.
This step volition too remove any loose fibres and remove the manufactured terminate allowing the colourant, practical later in this tutorial, to adhere to the leather properly.
After prepping, wipe the leather down with the Alcohol Cleaner, this volition remove whatever dirt or grit from the area before moving on to the next step.
STEP 2. Tidy the area
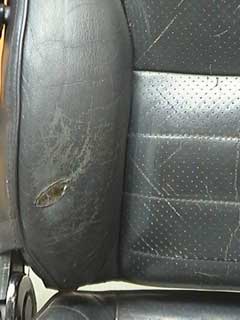
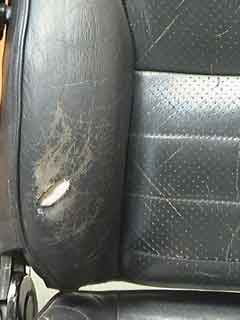
If you lot look at the hole yous tin can run across that the leather is sticking outwards, like a lip. This lip will compromise the quality of the repair and it should be removed.
Using the scalpel or a pair of scissors, carefully remove the lip by cutting information technology away at the base, taking care not to damage the surrounding leather.
STEP three. Apply the bankroll patch
In society to provide a firm bankroll for the repair, the leather repair sub-patch should be applied. Take the patch supplied in the kit and cut it to size, it should be plenty to completely embrace the repair with an additional 1cm of material surrounding the hole.
Once this is done apply the tweezers to insert one side of the patch underneath the leather so that the 1cm excess is completely under the leather. Apply pressure to hold this in place and gently feed the patch under the remaining edges of the pigsty. When done the patch should prevarication flat nether the repair, and the 1cm surrounding material we left should be underneath the leather on all sides.
When this is done, put a small amount of Leather Glue onto the spatula supplied and feed this underneath the edges of the hole to coat the underside of the leather surrounding information technology, taking care not to motion the canvas patch. When all edges have been glued, apply pressure to bond the leather to the patch and allow to dry.
STEP 4. Fill the hole

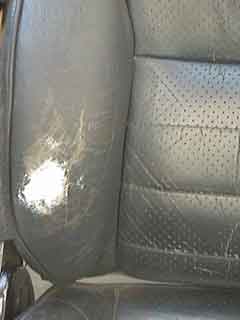
Now that the backing patch is firmly in identify, the hole in the leather must be filled. In society to do this; take a small amount of the Heavy Filler using the stop of the palette knife and identify a thin layer into the pigsty over the backing patch. Brand sure all the layer is very thin, but covering the sub-patch and allow 20 minutes to dry, this can be speeded upwards by using a hair dryer.
Go on applying the heavy filler in thin layers, it is crucial to use thin layers as the filler shrinks as it dries and may not cure properly if the layers practical are as well thick. As a general rule, at least v-6 thin layers should be used to build up the filler until the filler level is built upward to just beneath the peak of the hole.
To remove excess, with the awarding of each layer, smooth the surface area over with the sharper edge of the palette knife earlier drying the layer practical.
Stride v. More Layers of Filler
This is an illustration of what the hole will await like subsequently 5 or 6 layers of filler take been used.
It will not be smoothen only it volition have nearly filled the hole completely.
Pace 6. Add the final layer of filler
Employ the concluding layer of filler to the hole, completely filling it and then that it is on an even level with the surrounding leather on the seat. Take intendance to permit this final layer cure properly as when cured the filler tin compress, reducing it to below the desired level.
Add more than repair filler if necessary.
If you rub over the hole and filler gets onto the leather, remove it with the palette knife.
Your aim is to fill the hole so that it is level with the leather and not over filled. If you lot do over fill it, you can reduce it with sandpaper.
When y'all are happy with the level of the filler, and you can no longer feel any 'ridge' between the level of the filler and the surrounding leather, clean the surface area with the Alcohol cleaner again to remove whatsoever unwanted filler and dust from the surrounding area.
STEP vii. Apply an initial coat of colourant
The colourant supplied with the kit should take been matched to the color of the leather item being repaired, unless you are completely re-colouring information technology.
Have one of the sponges supplied in the kit and utilise a small amount of colourant to it, then rub this into the area of the repair thoroughly. This allows the colourant to penetrate into the creases of the leather and valleys of the grain, giving a better overall end.
When this is done, motility onto the next step, where the colourant is sprayed on.
Stride eight. Finish the job
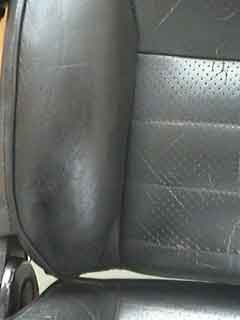
Using an airbrush spray as many thin coats of colour over the leather machine seat to thoroughly blend in the repair. For the best result, ensure that each coat is very thin and is given sufficient fourth dimension to cure before applying the next. This will enable an even cease to be congenital up and will avoid issues with uncured colourant. Information technology is not uncommon for the best repairs to apply 10-15 thin coats of colourant, depending on the extent of the damage and the colour used.
Once you are happy that the repair is concealed, the colourant is cured properly and it is well composite with the surrounding leather, the stop can be applied. Using the spray gun employ 4 or five thin coats of the finish, again assuasive time for it to dry between each glaze. The terminate seals the colourant in the leather preventing information technology from wearing and prolongs the leathers life.
When complete, allow 24 hours earlier using the item, to ensure the filler, colourant and cease take cured sufficiently.
In addition to the Leather Repair Kit, the Small-scale Leather Colourant Kit was used to color this job as the surface area being repaired was quite large and required spraying.
Source: https://www.furnitureclinic.co.uk/e-learning/how-to-fix-a-hole-in-a-leather-car-seat/
0 Response to "How To Repair Leather Hole"
Post a Comment